Wearable Watch App Sync with Mobile Device

  • 30th Apr, 2021
  • Hardik D.
Share
  • LinkedIn-icon
  • WhatsApp-icon

Wearable Watch App Sync with Mobile Device

30th Apr, 2021 | Hardik D.

  • Software Development
App Development

What are You Going to Learn?

Built a little interface for Apple Watch using WKInterfaceController. Transferring data from iPhone to Apple Watch is very similar to vice versa. However, in this demo, we will add a UITableView to the iPhone app, and update the WKInterfaceTable on the watchOS app.

What is WKInterfaceController?

A class that provides the infrastructure for managing the interface in a watchOS app. An interface controller serves the same purpose as a UIViewController object in a UIKit app, except that it does not manage any actual views. It runs in your WatchKit extension and remotely manages the behavior associated with an interface controller in your Watch app’s storyboard file. Subclass WKInterfaceController use its methods to configure the elements of your storyboard scene and to respond to interactions with those elements.

Let’s Dive Programmatically

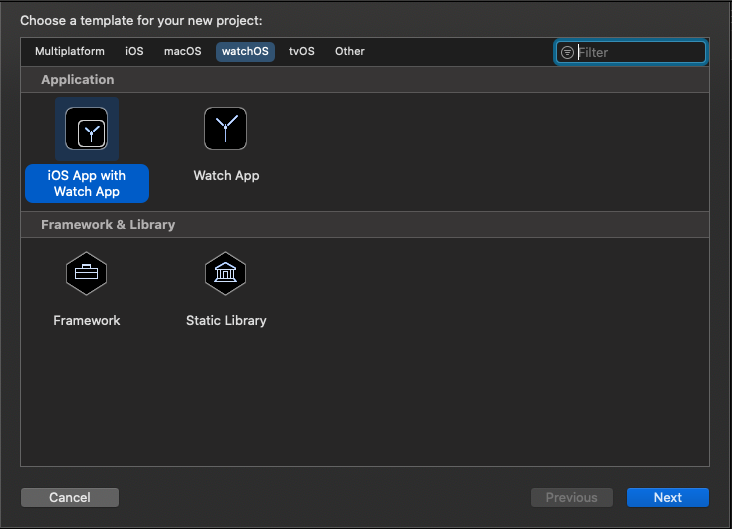
We are going to create a new project. Select the template for ‘iOS App with WatchKit App’ and follow basic steps to create it.

iOS App with WatchKit App

What is App Group?

An App cannot access data outside the sandbox due to privacy and security reasons. To support App extensions, Apple provides shared resources called App group. App Group only works when we enable it in Containing App, App extension as well as App Developer Portal.

How to Create App Group?

Select App or App Extension => signing & capabilities => Click +

App Group

Apple Watch Interface

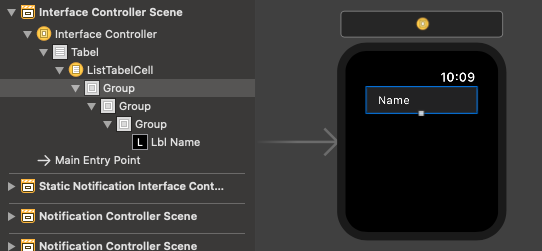
Now, we are going to create a little interface for the Apple Watch composed by WKInterfaceTable . Next, inside the Table, we are going to insert WKInterfaceLabel and set the number of lines to 0.

Here, WKInterfaceTable serves the same purpose as a UITableView object and WKInterfaceLabel serves the same purpose as a UILabel in a UIKit app.

Apple Watch Interface

Set up the watchOS App

Now, connect the Table from Interface Builder to code in InterfaceController. So, we first need to import the WatchConnectivity framework.

import WatchKit
import WatchConnectivity

Next, we will use WCSession.default and classes, however we need to add delegate method activationDidCompleteWith . WCSession.default is mainly used for transferring data from iPhone to Apple Watch or Apple watch to iPhone.

class InterfaceController: WKInterfaceController, WCSessionDelegate {
    
    func session(_ session: WCSession, activationDidCompleteWith activationState: WCSessionActivationState, error: Error?) {
    }
    
    let session = WCSession.default
    
    var string = [String]()
   
    override func awake(withContext context: Any?) {
       
        session.delegate = self
        session.activate()
       
    }

How to Display Content on WKInterfaceTable ?

We will use setNumberOfRows for multiple rows and for loop is used to set Content on WKInterfaceTable.

tabel.setNumberOfRows(mes.count, withRowType: "ListTabelCell")
        
for (i, info) in string.enumerated() {
    let cell = tabel.rowController(at: i) as! ListTabelCell
    cell.lblName.setText(info)
 }

For receiving the data in Apple watch, we will use didReceiveMessage.

func session(_ session: WCSession, didReceiveMessage message: [String : Any]) {

}

Setup the iOS App

Firstly, in the iOS app’s UIViewController , we need to set up few things:

import UIKit
import WatchConnectivity


class ViewController: UIViewController, WCSessionDelegate {
    func session(_ session: WCSession, activationDidCompleteWith activationState: WCSessionActivationState, error: Error?) { 
    }
    
    func sessionDidBecomeInactive(_ session: WCSession) {    
    }
    
    func sessionDidDeactivate(_ session: WCSession) {    
    }
    
    @IBOutlet weak var tblData: UITableView!{
        didSet{
            tblData.reloadData()
        }
    }
    
    var session: WCSession?
    let itemcell = "ListTableViewCell"
    var string = [String]()
    
    override func viewDidLoad() {
        super.viewDidLoad()
        
        let nib = UINib(nibName: itemcell, bundle: nil)
        tblData.register(nib, forCellReuseIdentifier: itemcell)
        tblData.delegate = self
        tblData.dataSource = self

        if WCSession.isSupported() {
                    session = WCSession.default
                    session?.delegate = self
                    session?.activate()
                }
    }

}

So, we first need to import the WatchConnectivity framework. Without that, nothing else we do would work. Next, to respond to callbacks from the WCSession , we need to set this ViewController as the WCSession’s delegate, and to do that we need it to confirm to the WCSessionDelegate protocol, so add that after the ViewController’s UIViewController superclass declaration.

To set up the session, first we check the response from WCSession’s "isSupported" method. This tells our code whether it even handles sessions. This is particularly important if this code is run on an iPad. You can’t currently pair an Apple Watch to an iPad, so this would respond with a false, and you should just not run any Watch Connectivity code at all. On the iPhone though, this would respond with true.

Add UITabelview Delegates and Datasource method

extension ViewController : UITableViewDelegate , UITableViewDataSource{
  
    func tableView(_ tableView: UITableView, numberOfRowsInSection section: Int) -> Int {     
        return string.count
    }
    
    func tableView(_ tableView: UITableView, cellForRowAt indexPath: IndexPath) -> UITableViewCell {
        let cell = tableView.dequeueReusableCell(withIdentifier: itemcell, for: indexPath) as! ListTableViewCell
        cell.lblName.text = string[indexPath.row]
        cell.selectionStyle = .none
        cell.viewMain.layer.cornerRadius = 5
        return cell
    }
    
    func tableView(_ tableView: UITableView, heightForRowAt indexPath: IndexPath) -> CGFloat {
        return 50
    }
    
}

Add TextField in Alert Controller

let alertVC = UIAlertController(title: "Enter Name", message: "", preferredStyle: .alert)
        alertVC.addTextField { (textField) in
            textField.placeholder = "Name"
        }
        
        let submitAction = UIAlertAction(title: "ADD", style: .default, handler: { [self]
            (alert) -> Void in
            let nameTextField = alertVC.textFields![0] as UITextField
            string.append(nameTextField.text!)
            tblData.reloadData()                 
        })
        
        let CancelAction = UIAlertAction(title: "CANCEL", style: .default, handler: {
            (alert) -> Void in            
            alertVC.dismiss(animated: true, completion: nil)            
        })
        
        alertVC.addAction(submitAction)
        alertVC.addAction(CancelAction)
        alertVC.view.tintColor = UIColor.black
        present(alertVC, animated: true)

Pass Data to Apple Watch

if let validSession = self.session, validSession.isReachable {
                let data: [String: Any] = ["iPhone": string as Any] 
                validSession.sendMessage(data , replyHandler: nil, errorHandler: nil)
}

Receive Data on Apple Watch and Set Data on Table

func session(_ session: WCSession, didReceiveMessage message: [String : Any]) {

        let mes = message["iPhone"] as! [String]
        tabel.setNumberOfRows(mes.count, withRowType: "ListTabelCell")
        string = (message["iPhone"] as? [String])!
        if let value = message["iPhone"] as? [String] {//**7.1
            for (i, info) in value.enumerated() {
                let cell = tabel.rowController(at: i) as! ListTabelCell
                cell.lblName.setText(info)
            }
        }
        scroll(to: tabel, at: WKInterfaceScrollPosition(rawValue: mes.count - 1)!, animated: true)

    }

There you go, we successfully build an iOS app to show real-time functionalities between iPhone app and Apple watch.

References:

1. Coding explorer

2. Apple

More blogs in "Software Development"

DevOps
  • Software Development
  • 18th Nov, 2023
  • Aarav P.

Mastering DevOps: A Comprehensive Guide to Essential Tools

DevOps, a mix of "development" and "operations," is a modern wonder that brings teams together, makes work easier, and speeds up software delivery. But what are...
Keep Reading
Future of SaaS
  • Software Development
  • 22nd Dec, 2023
  • Arjun S.

Future of SaaS: Key Predictions and Trends for 2024

In the digital era, the Software as a Service (SaaS) industry stands as a technological vanguard, driving innovation and transforming the way businesses operate. Take a...
Keep Reading
Object Detection
  • Software Development
  • 16th Jul, 2021
  • Kinjal D.

Three Ways of Object Detection on Android

Object detection on Android has evolved significantly over the years, and with the advent of powerful machine learning models and improved hardware capabilities, developers now...
Keep Reading