In an era dominated by technological advancements, face detection has emerged as a groundbreaking technology, transforming the way we interact with devices and systems.
From enhancing security measures to personalizing user experiences, the applications of face detection are diverse and continually evolving.
What are you going to learn?
We will show you how to detect faces and their features using the Vision Framework in an iOS app. We will receive live frames of the front camera of an iOS device.
Next, we will analyze each frame using the Vision framework’s face detection. After analyzing a particular frame it can detect a face and it’s features.
In this blog, you’ll learn how to use the Vision framework to:
Create requests for face detection and detecting face landmarks.
Process these requests and return the results.
Overlay the results on the camera feed to get real-time face detection.
What is Face Detection?
Face detection is a subset of computer vision, a field of artificial intelligence (AI) that empowers machines to interpret and make decisions based on visual data.
At its core, face detection involves the identification and localization of human faces within images or videos.
This process relies on sophisticated algorithms that analyze facial features, patterns, and contextual information to accurately recognize and differentiate faces from their surroundings.
Face detection just means that a system can identify that there is a human face present in an image or video. For example, Face Detection can be used for auto-focus functionality in cameras.
Why use the Vision Framework for Face Detection?
Vision algorithms are more accurate and less likely to return false positives or negatives. Apple claims that the framework leverages the latest machine learning (deep learning) and computer vision techniques, which have improved results and performance.
The Vision Framework can detect and track rectangles, faces, and other salient objects across a sequence of images.
Vision Concept
The Vision framework follows the simple mechanism to obtain computer vision as:
Request, Request Handler, and the Observation of that request.
Let's see the base classes and categories of Vision. Under the roof, there are 3 main class categories:
VNDetectFaceRectanglesRequest for Face detection.
VNDetectBarcodesRequest for Barcode detection.
VNDetectTextRectanglesRequest for Text region.
For iOS face detection just need to implement VNDetectFaceRectanglesRequest.
How to Stream the Front Camera Feed for Face Detection?
In the first step we want to stream the camera feed from the front camera or the back camera to the screen.
Let’s start with adding the camera feed to the ViewController. First we will require access to the front camera.
We will use the AVFoundation framework provided by Apple on the iOS platform to do so. AVFoundation framework allows us to access the camera and facilitates the output of the camera in our desired format for processing.
To gain access to the AVFoundation framework add the following line after Import Foundation in ViewController.swift
import AVFoundation
Now, we create an instance of a class called AVCaptureSession. This class coordinates multiple inputs such as microphone and camera with multiple outputs.
privatelet captureSession =AVCaptureSession()
Now we are adding the front camera as an input to our CaptureSession. The function starts by fetching the front camera device. Let’s call this function, At the end of ViewDidLoad.
privatefuncaddCameraInput() {
guardlet device =AVCaptureDevice.DiscoverySession(
deviceTypes: [.builtInWideAngleCamera, .builtInDualCamera, .builtInTrueDepthCamera],
mediaType: .video,
position: .front).devices.first else {
fatalError("No back camera device found, please make sure to run SimpleLaneDetection in an iOS device and not a simulator")
}
let cameraInput =try!AVCaptureDeviceInput(device: device)
self.captureSession.addInput(cameraInput)
}
Now for back camera as an input to CaptureSession, use the following function:
privatefuncaddCameraInput() {
guardlet device =AVCaptureDevice.DiscoverySession(
deviceTypes: [.builtInWideAngleCamera, .builtInDualCamera, .builtInTrueDepthCamera],
mediaType: .video,
position: .back).devices.first else {
fatalError("No back camera device found, please make sure to run SimpleLaneDetection in an iOS device and not a simulator")
}
let cameraInput =try!AVCaptureDeviceInput(device: device)
self.captureSession.addInput(cameraInput)
}
If you want flip camera button to switch between front and back camera use this following function:
fileprivatefuncswapCamera() {
// Get current inputguardlet input = captureSession.inputs[0] as?AVCaptureDeviceInputelse { return }
// Begin new session configuration and defer commit
captureSession.beginConfiguration()
defer { captureSession.commitConfiguration() }
// Create new capture devicevar newDevice: AVCaptureDevice?
if input.device.position == .back {
newDevice = captureDevice(with: .front)
} else {
newDevice = captureDevice(with: .back)
}
// Create new capture inputvar deviceInput: AVCaptureDeviceInput!
do {
deviceInput =tryAVCaptureDeviceInput(device: newDevice!)
} catchlet error {
print(error.localizedDescription)
return
}
// Swap capture device inputs
captureSession.removeInput(input)
captureSession.addInput(deviceInput)
}
/// Create new capture device with requested positionfileprivatefunccaptureDevice(withposition: AVCaptureDevice.Position) -> AVCaptureDevice? {
let devices =AVCaptureDevice.DiscoverySession(deviceTypes: [ .builtInWideAngleCamera, .builtInMicrophone, .builtInDualCamera, .builtInTelephotoCamera ], mediaType: AVMediaType.video, position: .unspecified).devices
//if let devices = devices {for device in devices {
if device.position == position {
return device
}
}
//}returnnil
}
For an app to access the camera, the app must declare that it requires to use the camera in its Info.plist file. Open Info.plist and add a new entry to the property list. For key, add NSCameraUsageDescription and for value, enter Required for front camera access.
Once we have the front camera feed, now we have to display it on screen. For such a task we are going to make use of the AVCaptureVideoPreviewLayer class.
AVCaptureVideoPreviewLayer is a subclass of CALayer and it is used for displaying the camera feed. Add this as a new property to ViewController.
The property is lazy loaded as it requires CaptureSession to be loaded before it. Thus we used the lazy keyword to defer the initialization to a point where the CaptureSession would already be loaded.
We adapt the preview layer’s frame when the container’s view frame changes, it can potentially change at different points of the UIViewController instance lifecycle.
The CaptureSession starts coordinating its input which provides preview, and outputs. At the end of ViewDidLoad call the following line.
self.captureSession.startRunning()
How to Detect Faces and Draw Bounding Boxes on the Face?
Let’s extract the image. For this task, we will require our CaptureSession to output each image. We will need to make use of AVCaptureVideoDataOutput. Within the ViewController class create an instance of AVCaptureVideoDataOutput.
Now add the function to receive the frames from the CaptureSession. The CaptureOutput function receives the frames from the VideoDataOutput.
funccaptureOutput(
_output: AVCaptureOutput,
didOutputsampleBuffer: CMSampleBuffer,
fromconnection: AVCaptureConnection) {
guardlet frame =CMSampleBufferGetImageBuffer(sampleBuffer) else {
debugPrint("unable to get image from sample buffer")
return
}
print("frame")
self.detectFace(in: frame)
}
Now we will use Vision frameworks VNDetectFaceLandmarksRequest for landmark detection. To access Vision we must first import it in the file using it, at the top of ViewController.
Before the Vision framework can track an object, we should know which object is to be tracked. Determine which face is to be tracked by creating a VNImageRequestHandler and passing it a still image frame. In the case of video, submit individual frames to the request handler as they arrive in the delegate method.
The results returned contain a property named BoundingBox for each observed face. We will take each face in turn and extract the bounding box for each of those.
The face observation result returns a bounding box with the location of the face in the image. However, the image resolution differs from the screen resolution.
Therefore we need a conversion function. The Apple provides a conversion function on AVCaptureVideoPreviewLayer instance named layerRectConverted(fromMetadataOutputRect:) to convert from the image coordinates and screen coordinates.
Now call our new handleFaceDetectionResults from the detect face function.
 private func detectFace(in image: CVPixelBuffer) {
        let faceDetectionRequest = VNDetectFaceLandmarksRequest(completionHandler: { (request: VNRequest, error: Error?) in
            DispatchQueue.main.async {
                if let results = request.results as? [VNFaceObservation] {
                    self.handleFaceDetectionResults(results)
                } else {
                    self.clearDrawings()
                }
            }
        })
        let imageRequestHandler = VNImageRequestHandler(cvPixelBuffer: image, orientation: .leftMirrored, options: [:])
        try? imageRequestHandler.perform([faceDetectionRequest])
    }
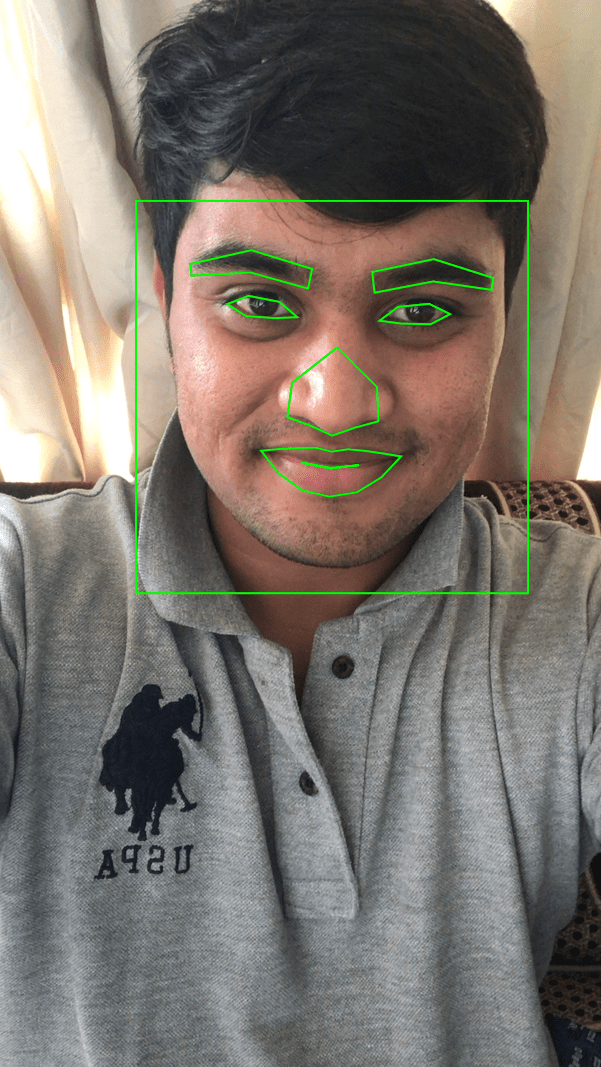
Below function is used for drawing features on the face:
Face detection technology stands at the forefront of the technological revolution, influencing sectors ranging from security to marketing.
As we navigate the evolving landscape of AI, it is essential to embrace the potential of face detection while remaining vigilant about its ethical implications.
By fostering responsible innovation, we can unlock the full spectrum of benefits that this transformative technology has to offer.
It is a new high-level framework for computer vision, which is the best among all other frameworks for image processing. It obtains the highest accuracy in a very short processing time without any latency.
Features like the privacy of users’ data, consistent interface, no cost, and real-time use case make Vision even more efficient.
DevOps plays a crucial role in mobile app development, bridging gaps between teams and ensuring faster, more efficient processes. This blog explores how DevOps benefits...
In the ever-evolving landscape of technology, businesses are increasingly turning to custom software development to meet their unique needs and challenges.
Custom software development emerges as...
Restaurant mobile app development has become a key factor in the success of the food industry. By simplifying ordering systems and enhancing customer loyalty, mobile...