In today's fast-paced world, machine learning models need to be deployed quickly, efficiently, and at scale. Serverless architectures offer a compelling solution, enabling you to deploy models without managing servers or infrastructure.
This blog post will guide you through leveraging AWS ECR and SageMaker to achieve serverless deployment for your machine learning models.
Prerequisites and Key Concepts
1. Serverless Computing
A paradigm where you pay only for the resources your code consumes, eliminating server management and scaling concerns.
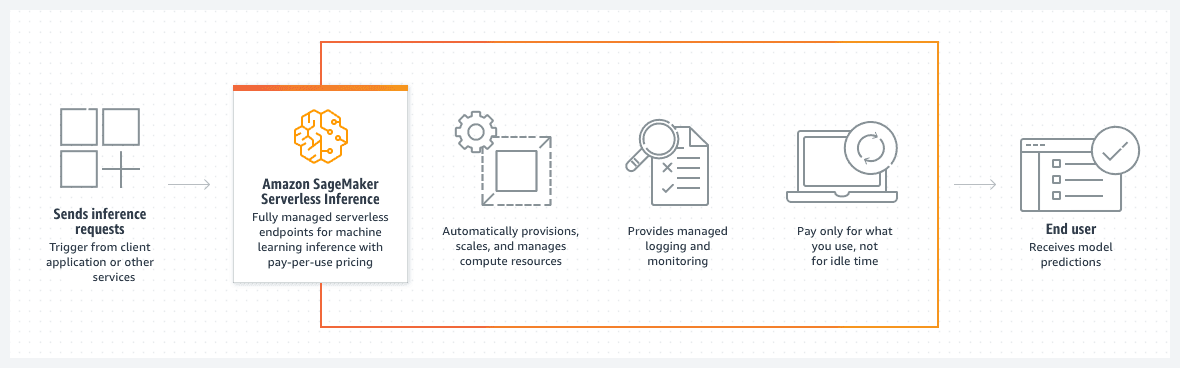
A fully managed service for building, training, and deploying machine learning models.
Procedure
Step 1: Code Containerization using Docker
1. Prepare Inference Code
Ensure that your inference code generates the final results intended by your model during training.
Consider adopting a standardised format such as JSON for clarity and compatibility across different systems.
If required, manage preprocessing and postprocessing tasks within the inference code to ensure accurate and seamless operation.
2. Build Flask APIs
/ping Endpoint:
Objective: Verify API health and readiness.
Return a simple message (e.g., "API is alive!").
Use a lightweight HTTP status code (e.g., 200 OK) for easy checking.
/invocations Endpoint:
Objective: Receive input data for the model and provide predictions in return.
Accept input data in a structured format, such as JSON.
Invoke the prepared inference code using the received data.
Deliver the final predictions in a consistent format, like JSON.
Take into account error handling and logging mechanisms to ensure robustness.
3. Combine Code and APIs
While consolidating these components for simplicity is understandable, enhancing maintainability and scalability can be achieved by segregating Flask API logic from the inference code.
Consider separating them into distinct modules for improved organisation. Aim to keep both the Flask app and inference code as streamlined as possible.
Step 2: Configure AWS CLI
The AWS Command Line Interface (CLI) is a powerful tool for managing AWS resources from the terminal. Follow these steps to set it up:
Note: Run the below commands in bash terminal.
1. Check if AWS CLI is installed:
aws cli
If the command doesn't respond, CLI is not configured.
2. Install AWS CLI:
Please follow this link to install aws cli based on your OS.
3. Set up a local user:
Create a new user in the Identity and Access Management (IAM) section of the AWS console.
Give the user full access to ECS with the policy named "AmazonECS_FullAccess."
Note down the access key and secret access key.
4. Configure AWS CLI:
aws configure
Enter the access key, secret access key, and preferred region. Skip the default output format for now.
5. Verify the configuration:
aws configure list
Step 3: Push docker image to ECR
After successfully creating a local Docker image and container, the next step is to publish it from our local Docker repository to AWS Elastic Container Registry (ECR), facilitated through Amazon Elastic Container Service (ECS).
Wondering what ECS is? Let me explain.
ECS, or Amazon Elastic Container Service, is a comprehensive container orchestration service. It's fully managed and simplifies the deployment, management, and scalability of containerized applications.
Additionally, Elastic Container Registry (ECR) serves as the dedicated registry for Docker containers stored within ECS.
In our workflow, we leverage ECS to seamlessly push our Docker container to ECR, ensuring efficient management and deployment of our containerized applications on the AWS platform.
docker tag <source_image_tag> <target_ecr_repo_uri>
Push the Docker image to ECR:
docker push <ecr_repo_uri>
Step 4: Model creation in AWS SageMaker
Navigate to the sagemaker -> Inference -> Models
Creating sagemaker model will package your model artifacts docker image for deployment on sagemaker. Below is the snapshot to create a model.
Step 5: Endpoint configuration
Navigate to the sagemaker -> Inference -> Endpoint configuration
Create an endpoint configuration by specifying the necessary parameters related to server configuration. Here, it is crucial to indicate the desired server type – whether 'serverless' or 'provisioned'.
Additionally, you need to define the 'Memory size' and 'Max Concurrency', representing the maximum concurrent invocations for a single endpoint.
Step 6: Endpoint
Navigate to SageMaker -> Inference -> Endpoint
Endpoint configurations in SageMaker allow you to create an endpoint. SageMaker generates an HTTPS URL, enabling you to invoke your endpoint seamlessly through client applications.
This is achieved using the existing runtime client and making an 'invoke_endpoint' request.
Step 7: Testing API
Once the endpoint is successfully deployed, it will automatically display the status 'inService' as it should.
All details regarding the API URL are provided in the endpoint details. You can directly test your URL through Postman requests or integrate it with your existing services.
Things to remember
Here are some important points to remember to ensure smooth serverless deployment without encountering issues:
Always ensure that port 8080 is open within the Docker container. Serverless deployed APIs internally utilise port 8080 for running our Docker code.
Prepare two APIs: '/ping' and '/invocations'. SageMaker defaults to checking the '/ping' API for health status and the '/invocations' API for inference.
When containerizing the code, set entry points to run the API code. This ensures that the API automatically starts as soon as the container initiates.
If the payload can be either JSON, raw text or a file, accommodate this flexibility. For file payloads, instead of sending form data, provide a URL for the file. Using the 'requests' library, the file can be downloaded during the API call rather than sending it directly.
Remember that during the serverless server build for inference, file storage for payloads is restricted to the '/tmp' directory. No other path is allowed for storing files.
Conclusion
In conclusion, the decision between serverless and provisioned services when deploying machine learning models with AWS SageMaker and ECR hinges on various factors, each with its own set of advantages and considerations.
Serverless Deployment
Serverless deployment using AWS SageMaker is an excellent choice for scenarios where flexibility, scalability, and cost efficiency are top priorities. This approach allows for automatic scaling, enabling you to handle varying workloads without manual intervention.
Serverless architectures are particularly beneficial for applications with sporadic or unpredictable usage patterns, as you only pay for the resources consumed during execution.
When rapid development, ease of management, and the ability to offload infrastructure concerns are paramount, serverless is often the preferred option.
It's well-suited for scenarios where the development team wants to focus primarily on the machine learning model's logic and less on infrastructure provisioning and management.
Provisioned Deployment
On the other hand, provisioned services are better suited for situations where predictability, fine-tuned control over resources, and specific performance requirements are crucial.
Provisioned services provide the necessary stability and control when dealing with steady, predictable workloads or when low-latency performance is a priority.
If your application demands dedicated resources, and you have specific infrastructure requirements that are known and consistent, provisioned services may be the more appropriate choice.
This approach allows for the customization of instances and infrastructure settings to meet the exact needs of your machine learning workload.
In summary, the decision to go serverless or provisioned depends on the specific requirements and priorities of your machine learning deployment.
Serverless is advantageous for its flexibility and cost-effectiveness, while provisioned services offer fine-grained control and stability for workloads with well-defined characteristics.
Careful consideration of these factors will guide you toward the deployment strategy that aligns best with your project's goals.
Financial software development has seen explosive growth in recent years, with more businesses and consumers turning to digital solutions for their financial needs. This article...
E-learning platform development has transformed the education landscape, enabling accessible and flexible learning experiences. Building a platform like Coursera requires careful planning. This blog outlines...
iOS app development has become a critical component of business expansion in today's digital landscape.
Custom iOS apps offer unique solutions tailored to specific business needs,...